
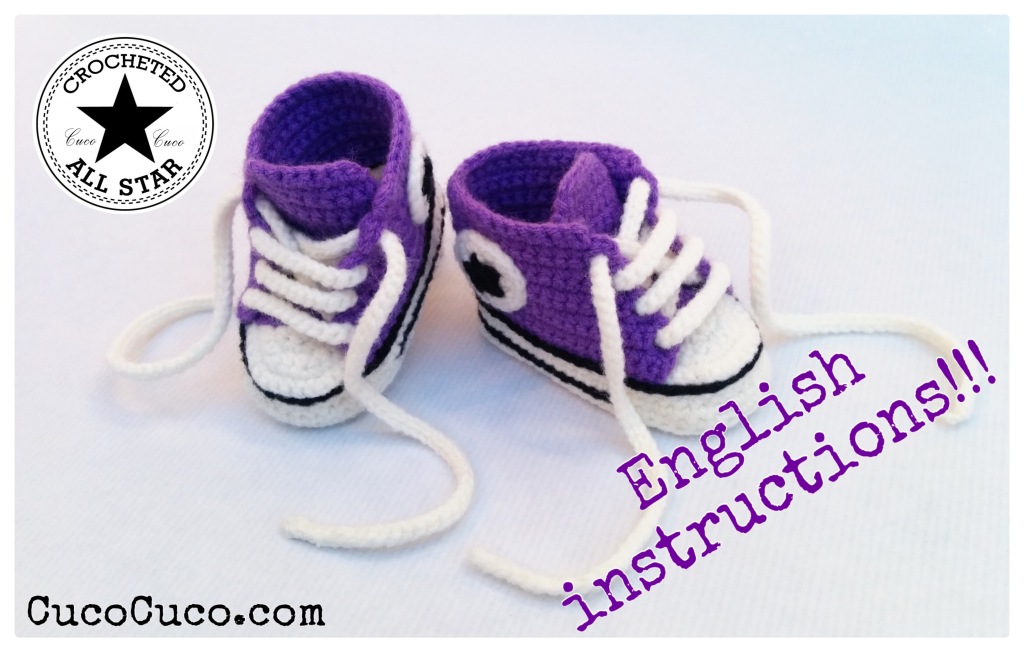
Finally available english tutorial baby booties «crocheted all star», hope you enjoy it!!!
Materials:
– 40 g “Suavel Coats” yarn or similar in white. Use with doble worsted.
– 40 g “Suavel Coats” yarn or similar in another color. Use with doble worsted.
– 10 g “Suavel Coats” yarn or similar in black, in this case use with single worsted.
– Embroidery needle.
– Crochet hook size : 2.00mm for size 0-months or whatever size needed to obtain sole lengths. Here I’ve written approximate foot lengths depending on age:
0-3 months: 9,5cm
3-6 months: 10,8cm
6-9 months:11,5cm
9-12 months: 12,2cm
Note: To increase size of the shoes, you can either increase thickness of the yarn or make an additional row like I show you in pink in sole’s crochet diagram (this row doesn’t appear in VIDEO 1).
Abbreviations used:
Ch: chain
St(s): stitch(es)
Slst: slip stitch
Sc: single crochet
Hdc: Half double crochet
Dc: Double crochet
Tg: together
INSTRUCTIONS
For further assistance, for each step in the instructions you can find in brackets a reference to a video where you can see the development of that step. For example, when you see (V1; 0:00 – 0:45), it means that you can see that step in Video 1, from minute 0:00 to minute 0:45.
Videos are in Spanish, for that reason I’ve written these instructions in English but regardless the language of the videos, they can help you to understand better the development of this instructions. Videos are at the end of this post.

Note: Ch stitches at the beginning of rounds do not count as first st. All rounds start in the same stitch as the ch stitches.
– Start with a slip knot (V1; 0:00 – 0:46)
– 15 Ch (V1; 0:46 – 1:11)
– Round 1: 1 sc in 3rd ch from hook, 6 sc, 5 dc, 8 dc in last ch, 5 dc working down the other side of the foundation ch, 6 sc, 3 sc in the last st, join with slst. (V1; 1:11 – 4:18) (34 total sts in round 1)
– Round 2: 2 ch, 13 dc, 2 dc in each of the next 6 sts, 13 dc, 2 dc in each of the next 2 sts, join with slst. (V1; 4:18 – 7:52) (42 total sts in round 2)
– Round 3: 2 ch, 13 dc, (2 dc in the next st, 1 dc in the next st) x 6 (this means repeat 6 times the instruction in brackets), 13 dc, (2 dc in the next st) x 4, join with slst. (V1; 7:52 – 11:47) (52 total sts in row 3). When you get to this point, you can make an additional row to increase size of the sole (in pink in the sole’s crochet diagram. This row doesn’t appear on VIDEO 1), but you also have to make an additional row in the toe.
.
SOLE’S DIAGRAM CROCHET (FROM ROUND 1 TO 3)

– Round 4: 1 ch, 52 sc taking half st, join with slst. (V1; 11:47 – 13:09) (52 total sts in round 4)
– Round 5: 1 ch, 52 sc, join with slst. (V1; 13:09 – 14:12) (52 total sts in round 5).
– Round 6: As round 5.
– Row 1: Find the center front stitch on the sole. Count over 7 sts on each side (9 or 10 sts if you have done an additional row on sole. 9 sts in the case of 1 additional row on toe cap and 10 sts for 2 additional rows on toe cap. It depends if you prefer a larger o smaller toe cap), but not counting center st, then mark those sts. Make 1ch next to the mark, 36 sc taking half st (or make sc taking half st until getting to next mark). (V2; 1:10 – 3:13) (36 total sts in row 1).
– Row 2: 1 ch, turn, 1 sc in 3rd ch from hook, 35 sc. (V2; 3:13 – 4:01) (36 total sts in row 2).
– Row 3: 3 ch, turn, 1 sc in 6th ch from hook (this is for an eyelet), 32 sc, turn, 3 ch and join with slst in last st (this is for the opposite eyelet). (V2; 4:01 – 6:45) (33 total sts in row 3)
– Row 4: 3 slst over 3 ch from previous row, 33 sc. (V2; 6:45 – 8:50) (33 total sts in row 4)
– Row 5: 3 ch, turn, 1 sc in 6th ch from hook, 28 sc, turn, 3 ch and join with slst in last st. (V2; 8:50 – 10:25) (29 total std in row 5).
– Row 6: 3 slst over 3 ch from previous row, 29 sc. (V2; 10:25 – 11:36) (29 total sts in row 6).
– Row 7: 3 ch, turn 1sc in 6th ch from hook, 24 sc, turn, 3 ch and join with slst in last st. (V2; 11:36-13:38) (25 total sts in row).
– Row 8: 3 slst over 3 ch from previous row, 25 sc. (V2; 13:38 – V3; 0:38) (25 total sts in row 8).
– Row 9: 3 ch, turn, 1sc in 6th ch from hook, 20 sc, turn, 3 ch and join with slst in last st. (V3; 0:38 – 2:38) (21 total sts in row 9).
– Row 10: 3 slst over 3 ch from previous row, 21 sc. (V3; 2:38 – 4:05) (21 total sts in row 10).
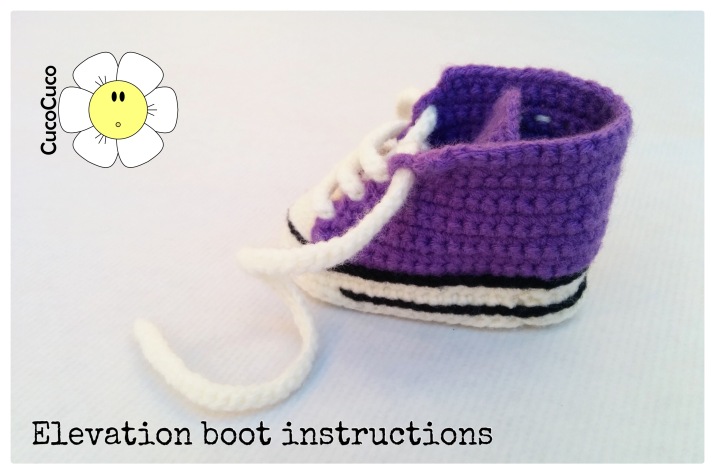
– Row 11 (This row doesn’t appear in video 3, but it makes the elevation of the boot higher and nicer): 1ch, 1 sc in 3rd ch from hook, 20 sc.
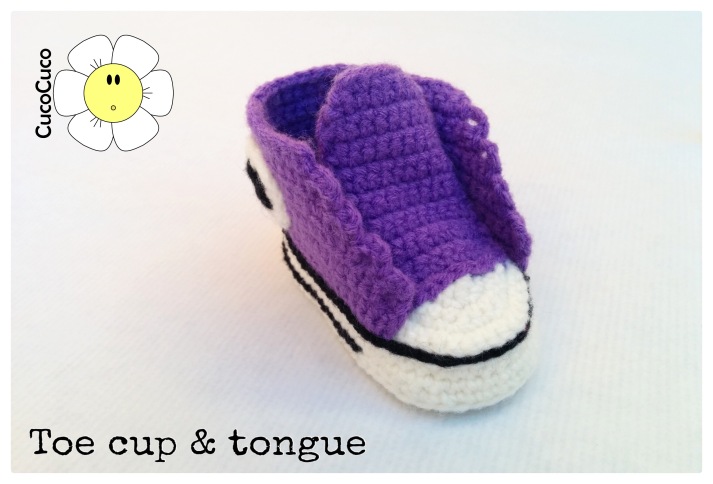
Toe cup
– Row 1: Start with magic circle (or magic ring), 1 ch, 4 sc through magic circle. Tighten the magic circle. (V3; 4:05 – 5:09) (4 total sts in row 1).
– Row 2: 1 ch, turn, 1 sc in 2nd ch from hook, (2 sc in next st) x 3. (V3; 5:09 – 6:30) (7 total sts in row 2)
– Row 3: 1ch, turn, 1 sc in 2nd ch from hook, (1 sc, 2 sc in next st) x 3. (V3; 6:30 – 7:48) (10 total sts in row 3).
– Row 4: 1 ch, turn, 1 sc in 2nd ch from hook, (1 sc, 1 sc, 2 sc in next st) x 3. (V3; 7:48 – 9:21) (13 total sts in row 4).
– Row 5: 1 ch, turn, 1 sc in 2nd ch from hook, (1 sc, 1sc, 1sc, 2 sc in next st) x 3. (V3; 9:21 – 11:42) (16 total sts in row 5). Fasten off leaving a 25cm tail. You will use this tail later on to attach the front section to the sole.
– If you have made an additional row on the sole, you aalso need make 1 or 2 additional rows in toe cap, following the same steps as before but with different frequency stitches. For 1 additional row, frequency stitches aré (1 sc, 1 sc, 1sc, 1sc, 2 sc in next st) x3, (19 total sts in row 6). If you want make 2 additional rows, frequency stitches for the second one are (1 sc, 1 sc, 1 sc, 1 sc, 2 sc in next st) x3, (22 total sts in row 7).
Tongue
– Row 1: 2 ch, 10 sc (1 or 2 more if you have made additional rows on sole) evenly spaced on the straight side of the toe cap. (V3; 11:42 – 14:14)
– Row 2: 1 ch, turn, 1 sc in 3rd ch froom hook, 9 sc. (V3; 14:14 – 14:48) (10 total sts in row 2)
– Repeat steps from row 2 until making 14 rows more. (V3; 14:48 – 18:00) (10 total sts in all rows)
– Seaming together toe cap with sole. (V4; 0:00 – 02:05)
Black lines on sole (with black yarn)
– These lines are made with chain stitch. (V4; 02:05 – 05:45)
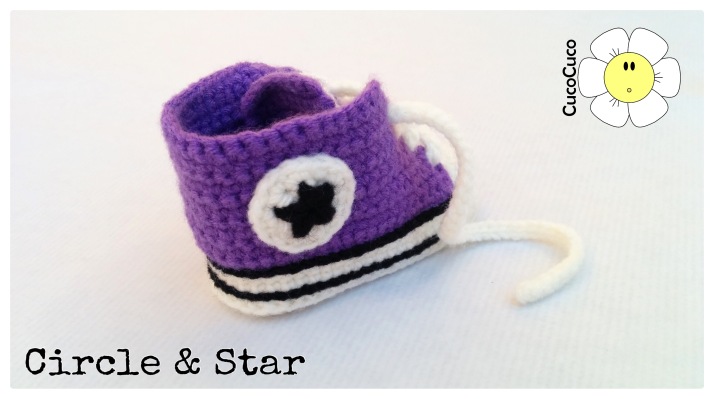
Circle
– Row 1: Start with magic circle, 2 ch, 9 hdc through magic circle, tighten the magic circle, join with slst. (V4; 05:45 – 07:30) (9 total sts in row 1).
– Row 2: 1 ch, (2 hcd in next st) x9, join with slst. Fasten off leaving a 25cm tail. You will use this tail later to attach the circle to the elevation of the boot.
(V4; 07:30 – 08:56) (18 total sts in row 2).
Star
To make the it is best to watch all steps in video (V4; 08:56 – 13:02).

– 200 ch (aprox)
– 1 slst in 2nd chain from hook, continue with slst until the end. (V4; 13:02 – 15:00)
I hope you like it, and please… SHARE IT!!

Hi. I am not sure about which place you are doing the single crochet stitch. Sometimes it looks like you are going into the top hole of the chain of the stitch and sometimes it looks like you are going through the hole underneath between the row beneath’s two single crochet’s.
Me gustaMe gusta
Hi Felisza!! I usually make single crochet under chain of slip stitch. 😘
Me gustaMe gusta
I am so sorry I am just seeing this, I thought I had the notifications on and I may have but gmail has too many tabs that it directs your mail to or it may have gone to spam. Thank you for replying, needless to say it took me until last night to truly get which hole to go through lol, I noticed that the beginning row was different than each subsequent row, so I have it now finally. I am still working on 1 shoe lmao.
Me gustaLe gusta a 1 persona
Happy to hear that!!! 😘😘😘
Me gustaMe gusta
can you send me english pattern for sole length of 2.5 inches best or 3 inches most .trying to find this mostly 2.5 inches with thicker sole for a preemie baby.I cannot find this pattern anywhere that small.can you help?
Me gustaMe gusta
Me gustan mucho los zapatitos las indicaciones son sencillas y se ve que se teje rápido voy a intentar realizarlos gracias por compartir Felicidades y hasta luego…..un abrazo desde apodaca nuevo León
Me gustaLe gusta a 1 persona
Son muy bonitos, ya verás que aunque lleva un tiempo hacerlos, no es muy complicado 😘😘
Me gustaMe gusta
Hola! Yo quiero agradecerte estos videos porque me han ayudado a realizar, no sólo las converse, si no también otros diseños a partir de aquí.Por eso hoy te dedico mi entrada en mi blogg de google, espero que podamos seguir compartiendo conocimiento o mejor dicho siga aprendiendo de ti. Un saludo!
Me gustaLe gusta a 1 persona
Muchas gracias!! Perdón por responder tan tarde…. Pero llevo unos meses muy complicados… pronto os lo explicaré
Me gustaMe gusta
Thank You so much! 💜😙
Me gustaMe gusta
Hello can you explain what is 36 sc taking half stitch I don’t understand
Me gustaMe gusta
It would be nice if your video would be in English
Me gustaMe gusta